Suite features
These features are the same in Draft, Grid and Deck: learn them once and use them in all three. Settings are shared by the three apps.
Command bar (Alt+Q)
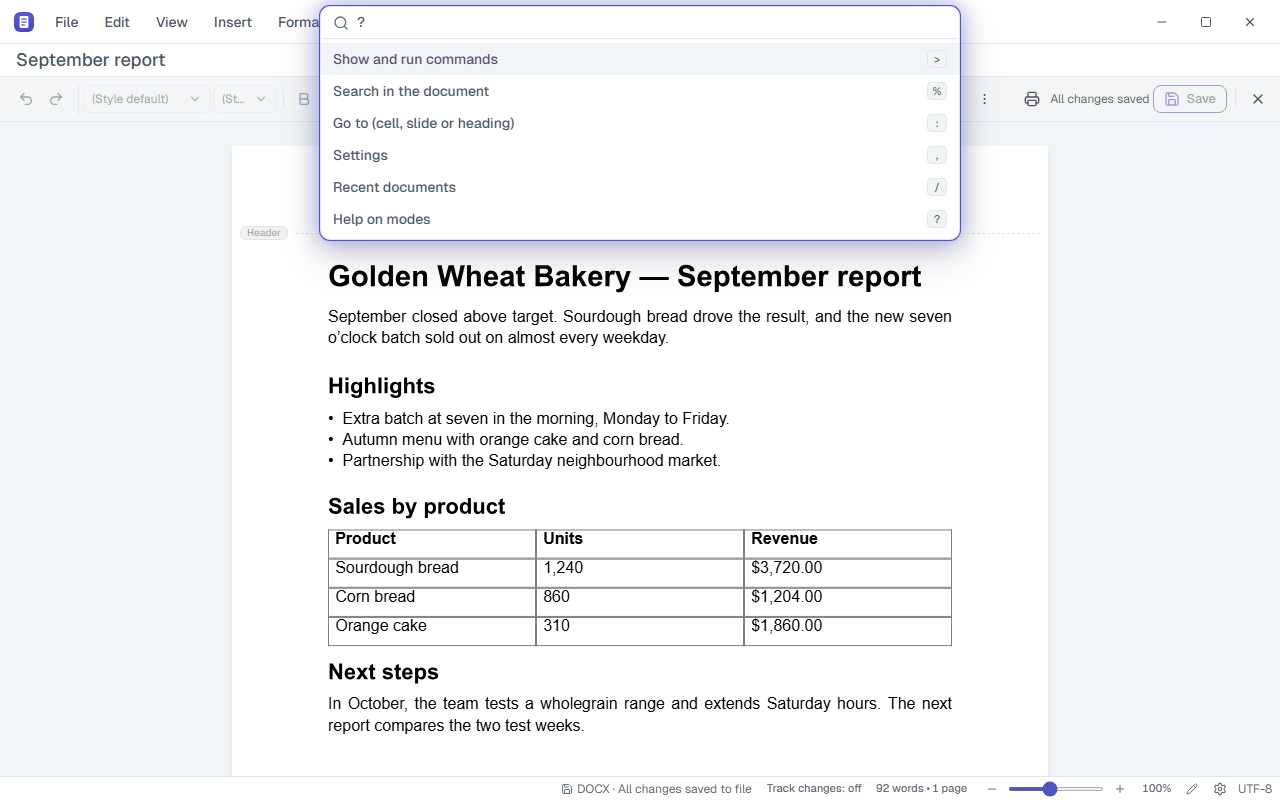
One box to find any command, search the document, jump to a place, change a setting or reopen a recent file. It sits in the center of the title bar.
Where:Center of the title bar · Alt+Q · Ctrl+Shift+P (commands mode)
Step by step
- Press Alt+Q.
- Type what you want to do, for example "bold" or "chart".
- To switch modes, start with a prefix: > commands, % search the document, : go to (cell, slide or heading), , settings, / recent, ? help on the modes.
- Use the arrow keys to choose and press Enter.
Tips
- With the box empty, Recently used appears.
- Some commands only appear here, such as Import document… and Open PDF… in Draft, and Undo levels….
Settings
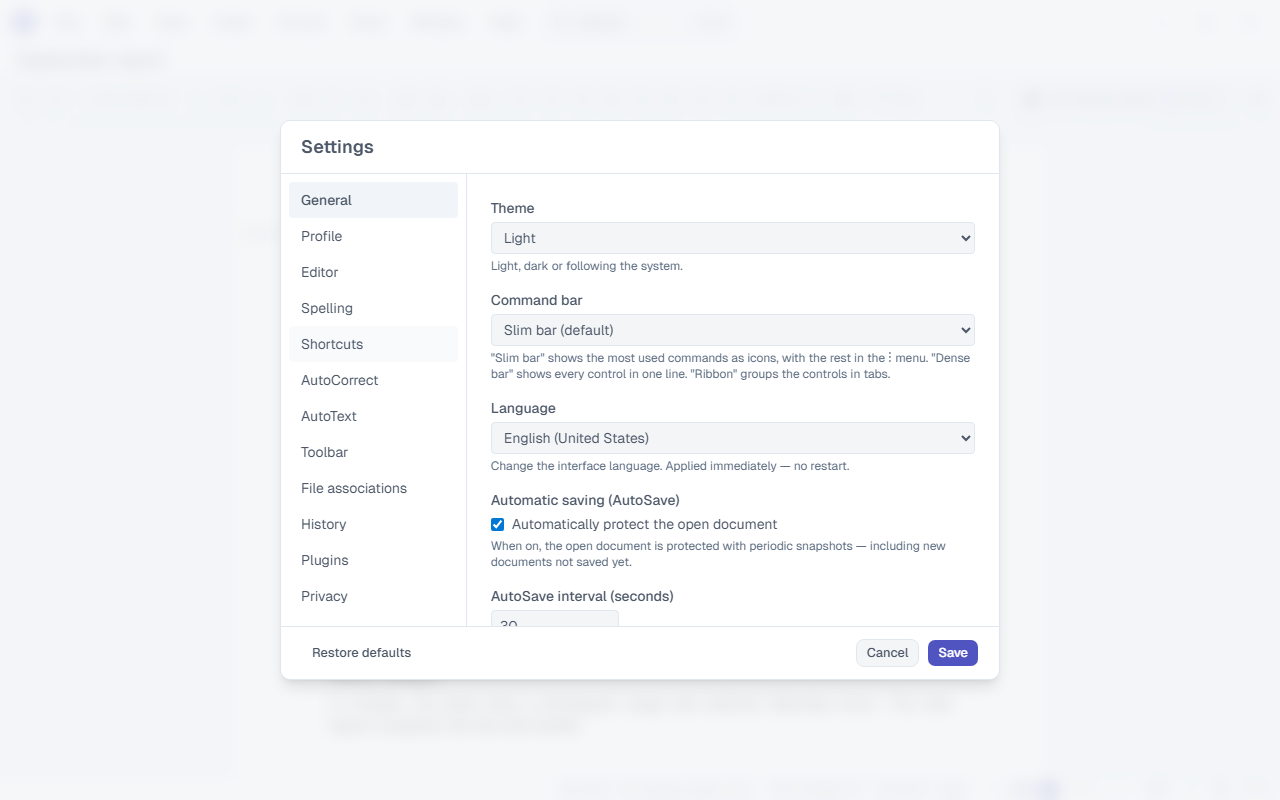
One dialog for all three apps. Each app shows the general options and its own; Grid does not show Draft options, for example.
Where:Ctrl+, · Settings button on the status bar · Alt+Q and type ,
Step by step
- Press Ctrl+,.
- Choose the tab on the left: General, Profile, Editor, Spelling, Shortcuts, AutoCorrect, AutoText, Toolbar, File associations, History, Extensions, Privacy or About.
- Change what you want and click Save.
Tips
- Some options take effect right away, such as default zoom, undo levels and dictionaries.
What it does not do
- Restore defaults returns every option to factory settings without asking for confirmation.
Interface language
The interface is available in Brazilian Portuguese, US English and Latin American Spanish.
Where:Settings › General › Language
Step by step
- Press Ctrl+,.
- On the General tab, under Language, choose Português (Brasil), English (United States) or Español (Latinoamérica).
- Click Save.
What it does not do
- The built-in help (F1) is only in Portuguese.
Automatic saving
Protects the open document at regular intervals. If the program closes without saving, you recover your work the next time it opens.
Where:Settings › General › Automatic saving (AutoSave)
Step by step
- Press Ctrl+,.
- On the General tab, leave Automatic saving (AutoSave) on.
- Set the interval in seconds (from 5 to 600; the default is 30).
Tips
- When you open after a crash, the Recover unsaved files notice offers Recover or Discard for each file.
Updates
Grafos looks for new versions on its own, downloads them, checks the digital signature and installs when you close the program.
Where:Help › Check for Updates · Settings › Privacy
Step by step
- Click Help › Check for Updates.
- If there is a new version, the notice shows Update available and downloads it in the background.
- When it is ready, click Restart now or just close Grafos.
Tips
- In Settings › Privacy you choose Check for updates automatically, the Check interval (Daily, Weekly or Monthly) and the Update channel (Stable or Beta).
What it does not do
- The portable version does not update itself: the notice offers Download the portable version.
- On Linux, the AppImage updates itself; the .deb package does not: the notice takes you to the Download page.
Account and profile
The account is optional and has no password: you sign in with a code sent by email. It keeps your name, your photo and your license.
Where:Settings › Profile · Avatar on the side bar
Step by step
- Press Ctrl+, and open the Profile tab.
- Type your email and click Send code.
- Type the 6-digit code you received and click Sign in.
- To add a photo, click Change photo and adjust the round crop.
Tips
- The photo is uploaded already cropped and reduced; the original file never leaves your computer.
What it does not do
- Documents never go to the account: it is not cloud storage.
License
The license lives in your account and covers a number of computers. The License section of the Profile shows the plan, the computers in use and the expiry date.
Where:Settings › Profile › License
Step by step
- Sign in to the account in Settings › Profile.
- In the License section, click Activate on this computer.
- If the computer limit is full, click Release next to a computer you no longer use.
Tips
- If a license warning bar appears, use Check now when you are online.
- Without internet, the section still shows until when this computer is licensed.
What it does not do
- There is no field to type a key: the license comes from the account.
- With the license expired beyond the grace period, documents open read-only and cannot be saved.
Version history
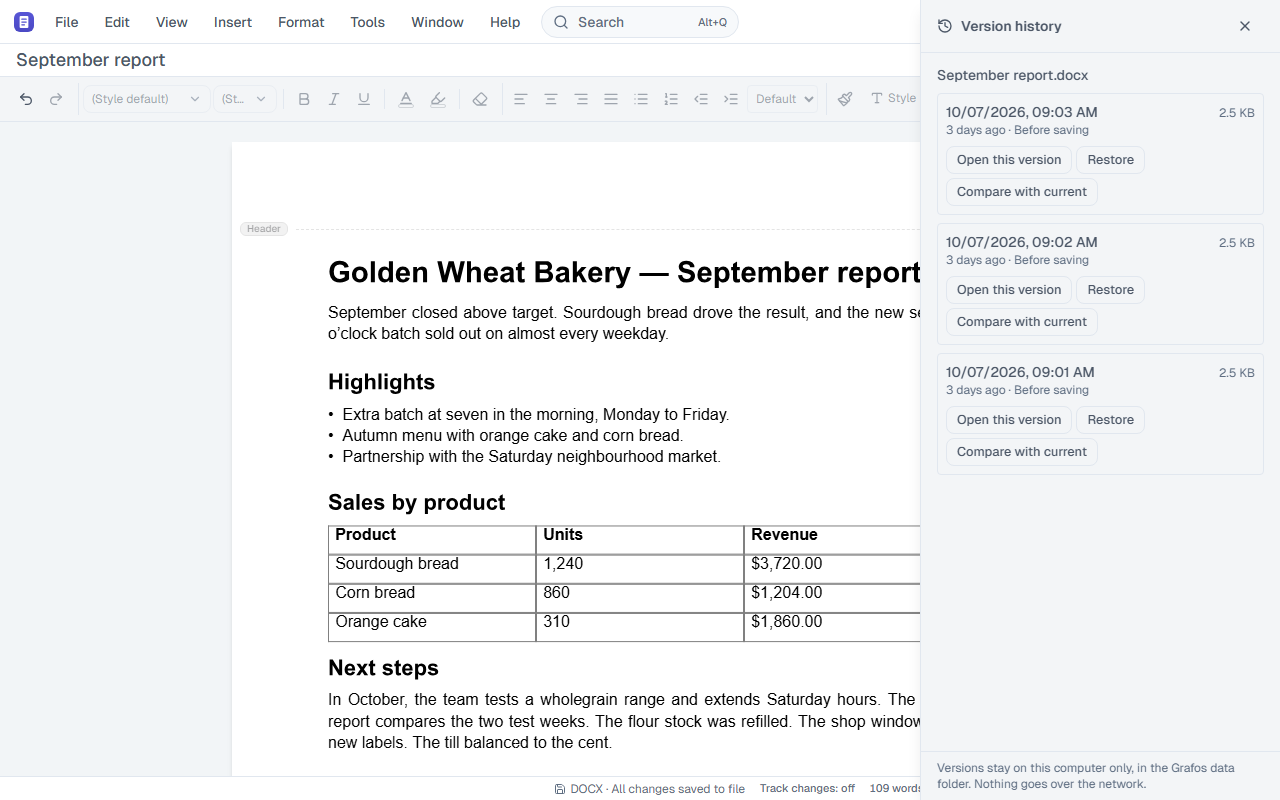
Every time you save, Grafos keeps the previous version of the file on this computer. You can open, compare or restore an old version.
Where:File › Version history… · Settings › History
Step by step
- With a file that has already been saved open, click File › Version history….
- Choose a version in the list.
- Click Open this version to read it in a read-only window, Compare with current to see the differences, or Restore to go back to it.
Tips
- Restore deletes nothing: the current version goes into the history as "Before restoring".
- Grafos keeps every version from the last 24 hours, one per day up to 30 days and one per week up to 6 months.
What it does not do
- A document that was never saved has no history.
- .sqlite databases are not kept in the history.
- In Draft the comparison shows as revisions; in Grid and Deck, side by side, without highlighting the difference.
Undo
Ctrl+Z undoes and Ctrl+Y redoes, in all three apps. You choose how many steps Grafos keeps.
Where:Edit › Undo · Edit › Redo · Settings › Editor › Undo levels
Step by step
- Press Ctrl+,.
- On the Editor tab, under Undo levels, choose 50, 100, 200 or 500.
Tips
- F4 and Ctrl+Shift+Z also redo.
Macros
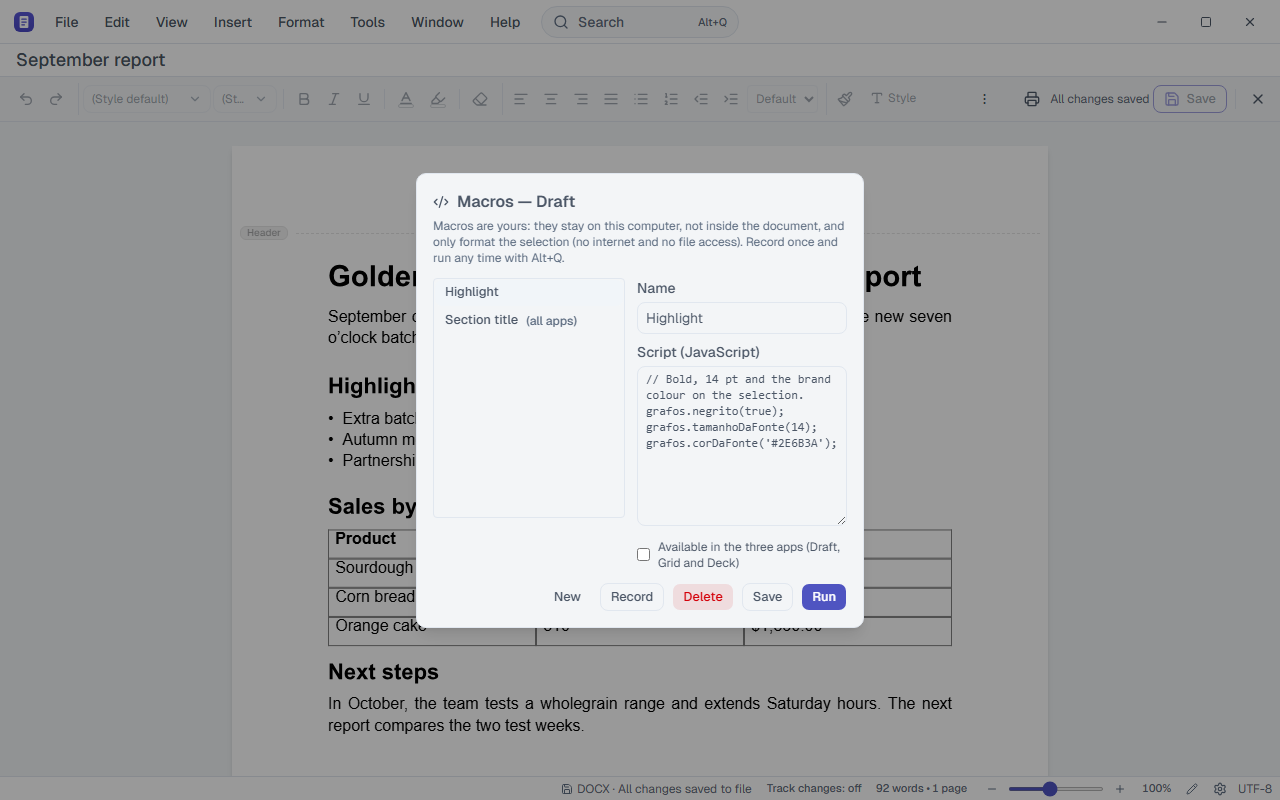
Record a sequence of formatting once and run it any time. Macros are yours: they live on this computer, not inside the document, and work in all three apps.
Where:Tools › Macros › Record macro · Tools › Macros › Macros… · Alt+Q and type the macro name
Step by step
- Select some text and click Tools › Macros › Record macro.
- Apply the formatting you want to repeat (bold, color, size, style…).
- Click Tools › Macros › Record macro again to stop, and give the macro a name.
- To run it, open Tools › Macros › Macros…, choose the macro and click Run, or type its name in Alt+Q.
Tips
- In Macros… you can also write or edit the macro in JavaScript, and choose whether it is available in all three apps.
- A single Ctrl+Z undoes everything the macro did.
What it does not do
- Recording keeps formatting; it does not record typed text or cursor movement.
- Macros cannot reach the internet or your files.
- VBA macros in .docm, .xlsm and .pptm files are preserved when you save, but do not run in Grafos.
Extensions
Extensions add plugins (commands and panels in all three apps), spelling dictionaries and glossary areas to Grafos. Each plugin declares what it can do, and you see and revoke each permission.
Where:Settings › Extensions · Plugins menu (appears when a plugin is on)
Step by step
- Press Ctrl+, , open the Extensions tab and choose Plugins in the filter.
- Under Available, click Install next to the plugin; for a file you already have, click Install from a file….
- Check the permissions and leave the plugin On.
- Use its commands from the Plugins menu or from Alt+Q.
Tips
- A plugin that sends data shows the exact text before each send, and the Extensions tab keeps a history of those sends.
- On the same tab, the Dictionaries and Glossaries filters install and update the spelling dictionaries and the glossary areas. Each package is checked before it is used.
- Under Installed, Remove takes the extension off this computer.
What it does not do
- Unverified plugins stay blocked until you turn on Allow unverified plugins.
AI with your own account (official plugin)
The official AI plugin brings AI to all three apps with YOUR account at a provider (OpenAI, Google or Anthropic) or with a local model (Ollama). The key is yours, from the provider: Grafos does not sell AI and nothing goes through our servers.
Where:Download page on this site · Settings › Extensions · Plugins menu · Alt+Q and type AI
Step by step
- Download the .grafosplugin file from the Download page and, if you want, check its SHA-256.
- Press Ctrl+, , open the Extensions tab, click Install from a file… and choose the file.
- Check the permissions, click Grant and leave the plugin On.
- Run AI: Set up provider and model… (Plugins menu or Alt+Q), choose the provider and the model, and paste your account’s key when Grafos asks for it.
- Use each app’s AI: … commands. Before each send, the preview shows the provider, the address, the model and the exact text; click Send or Do not send.
Tips
- The key stays in the system vault, not in the settings file. To change it, run AI: Change the provider key….
- With a local model (Ollama), the send goes to a program on your computer and nothing leaves for the internet.
- The Extensions tab keeps, on this computer only, the history of what was sent.
What it does not do
- Do not send sends nothing, and no AI command runs on its own.
- The plugin does not come with the installer: it is downloaded separately, only if you want it.
- Usage is billed by the provider, on your account, under the plan you have with them.
Customize the toolbar and shortcuts
Choose the buttons on each app’s slim bar and change the key for any command.
Where:View › Customize toolbar… · View › Customize shortcuts…
Step by step
- Click View › Customize shortcuts….
- Search for the command and click Change.
- Press the new combination. If it already belongs to another command, confirm with Swap.
- For the toolbar, click View › Customize toolbar…, choose the app and use Add, Remove, Move up and Move down.
Tips
- Reset all (shortcuts) and Reset to default (toolbar) go back to factory settings.
What it does not do
- Alt+Q and Esc cannot be changed.
- Only the slim bar can be customized; the dense bar and the ribbon are the factory ones.
Accessibility
All three apps work from the keyboard and with a screen reader. The checker points out what can get in the way of screen reader users.
Where:Tools › Check accessibility… · F10 or Alt (menu bar) · F6 (Draft: leave the page)
Step by step
- Click Tools › Check accessibility….
- Read the list in the Accessibility Checker.
- Click an item to go to the problem and fix it.
Tips
- F10 or Alt on its own take you to the menu bar; Alt+letter opens a menu directly.
- In Draft, Tab indents the paragraph; F6 moves the focus off the page.
What it does not do
- Grafos does not yet have a place to fill in an image’s alt text: the checker points out what is missing, but the fix has to be made in another editor.
Spelling and AutoCorrect
The spell checker underlines words the dictionary does not know, without writing anything into the document. AutoCorrect adjusts as you type.
Where:Tools › Spell check · F7 · Settings › Spelling · Settings › Extensions · Settings › AutoCorrect
Step by step
- Press Ctrl+, and open the Spelling tab.
- Click Download dictionaries: the Extensions tab opens on the Dictionaries filter. Click Install next to the language you write in.
- Leave Check spelling as I type on and choose the Checker language.
- In the text, right-click an underlined word to see suggestions, Ignore or Add to dictionary.
Tips
- Dictionaries stay on your computer: once downloaded, the checker works without internet.
- Shortcut: Ctrl+, › Extensions › Dictionaries › Install. When a dictionary has a new version, the button becomes Update.
- On the AutoCorrect tab, Your replacements keeps the substitutions you want (for example, "teh" with "the").
What it does not do
- Grammar checking exists only in Draft, in English and Portuguese (see Grammar on the Draft page).
- Today there are dictionaries to download for Português (Brasil), Português (Portugal), English (US), English (UK), Español, Français, Deutsch and Italiano.
Embedded fonts
Keep the fonts inside the file so it looks the same on a computer that does not have them. Works in Draft and Deck.
Where:File › File fonts (embed)…
Step by step
- Click File › File fonts (embed)….
- Check Embed fonts in the file.
- For a smaller file, check Only the characters used (smaller file).
- Click Apply and save the document.
What it does not do
- Fonts whose license forbids embedding are left out, with a warning.
- Grid does not embed fonts.
File associations
Choose which file types open with Grafos on double-click.
Where:Settings › File associations
Step by step
- Press Ctrl+, and open the File associations tab.
- Turn on the types that should open with Grafos and turn off the others.
What it does not do
- Applies only to your Windows user.
- If you chose another program in "Open with › Always use", that Windows choice wins; the screen tells you.
Ask for help
Send a support request from inside the app. You see exactly the text that will be sent before sending.
Where:Help › Ask for help… · Help › Diagnostics
Step by step
- Click Help › Ask for help….
- In Describe the problem (optional), tell what happened.
- Check the exact text that will be sent.
- Click Send request and note the ticket number.
Tips
- Without internet, use Copy diagnostics in Help › Diagnostics and send the text some other way.
What it does not do
- Needs internet. Nothing is sent without your click.
- The request does not carry your document.
Portable mode
The portable version runs from a folder or a USB stick, without installing. Settings and history stay with the programs, in the same folder.
Where:Portable version .zip file
Step by step
- Unzip the .zip into a folder or onto a USB stick.
- Open draft.exe, grid.exe or deck.exe.
What it does not do
- The portable version does not update itself: download the new .zip when the notice tells you.
What goes over the network
Documents never leave your computer. Grafos only uses the internet in the cases below, and each one has its own control.
Where:Settings › Privacy
Step by step
- Updates: the check for a new version, which you turn off in Settings › Privacy.
- Extensions: the list of what is available and the download of plugins, dictionaries and glossaries, only for what you choose to install on the Extensions tab.
- Account and license: the sign-in code and the license check, only with the account connected.
- Ask for help: only when you click Send request.
- Plugins: only those with network permission, showing the text before each send.
- AI (plugin): only the text you approve in the preview, straight to the provider you chose, with your key.
- Python in Grid: the interpreter is downloaded once, the first time you run a Python script.
Tips
- Collect error logs locally writes failures to a file on your computer; nothing is sent over the internet.